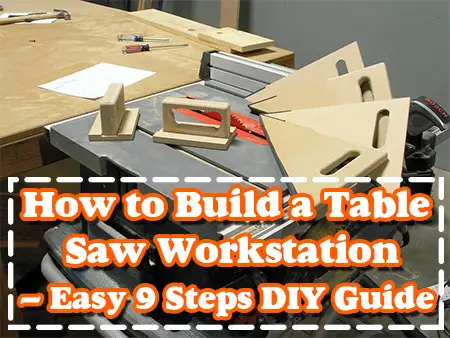
Do you always yearn to have your table saw workstation, but you cannot afford to have enough room?
Maybe you are not sure about how to build a simple table saw workstation and how long it would take you. Well, worry no more since we are here to cover you.
There are the best inexpensive table saw workstations in the market you can purchase. But if you are looking to have operational to be proud of, you better build it yourself.
In a few logical steps, we will teach you how to some of the secret skills you can follow to have your dream table saw workstation in a short while.
Things You Need How to Build a Table Saw Workstation
Before we start the whole lesson, there are some things you need to know. The entire project might cost you around $160.
A DIY project may take you a single weekend to complete. Also, you need to have some piece of tools that will facilitate you’re the success of the whole project.
- First, you should have with you a drill
- A circular table saw
- A jigsaw
- Sander
- Hammer
- Hole saw kit
- Nail gun
- Table measure
- For the materials. You will need plywood
- Polyurethane
- Sandpaper
- Wood glue
- Last but not least, you must have the table saw itself
Step by Step Guide on How to Build a Table Saw Workstation
What is the advantage of having your home-built Table Saw workstation? There are several merits on the same.
First, the setup of the whole system will be easy. Imagine you created the entire workstation yourself, you know the flaws, the ins, and outs of the system.
That means the installation process will be something simple to swallow.
Second, you can dismantle the workstation anytime, when you feel some spaces are not complete.
It will be easy to scrap something you built for yourself rather than something made by another person
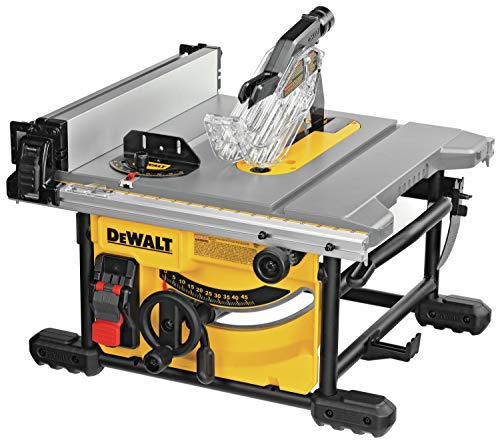
- Portability: Compact size for ease of transportation and storage
- Easy adjustments: Rack and pinion telescoping fence rails make fence adjustments fast, smooth and accurate
- Variety of cuts: 24.5 inches of rip capacity for ripping 4x8 plywood or OSB sheets
- Power: 15 Amp, 5800 rpm motor
- Onboard storage: Onboard storage provides easy access to the site pro guarding components and push stick when not in use
- Guaranteed tough: Metal roll cage ensures job site durability
Step 1: Build a Knockdown System Without Fasteners
Portable table saws are the best for any workshop. Once you are through with the projects, you fold them up, ready to park them into the vehicle. But if they are bulky and too heavy, there be some limits.
That is the reason we recommend the use of a knockdown table saw system. It is very suitable for your homemade table saw plans.
Many of the best table saws under 300 are made from this system. It has a super outfeed table with extra width to take more plywood being the best choice as your assembly workbench.
The system has some unique and smart duo trays, one for holding your hand’s tools while you are working on the projects and another for securing the table saw equipment.
That means it has multiple sensing push sticks and hearing plus vision protection units. It is also suitable for a middle workshop since you can set it fast even without fasteners and tuck it away in the evening when you are through with the schedule.
Step 2: Choosing the Lumber
There are several measurements for the legs, frames, and top. Initially, the use of several 2″*8*8′ boards and another one 2″*10*8′ boards were standard.
To make your work excellent, you can certainly use 2″*4′ lumber though it might be challenging to get such superior lumber
Step 3: Table Parts
Now you have all the tools, what next? Before anything else, you need to make panels for the workstation. That’s why we have plywood on our table for the materials we will need.
We recommend plywood from hardwood trees such as oak. Soft plywood is disadvantageous when it comes to working because they sink too quickly.
Besides, the cost of construction plywood is cheaper, unlike other activities.
That is the initial process of the series. You need to have separate sheets for the sides of the workstation and the panel’s end. As in the earlier note, you will make the panels from plywood.
So you require four plywood sheets to have the work done. You may also use these sheets to make the outfeed end of the workstation table. Label the side panel (1), the end panels two and (3 respectively), and the outfeed top 4.
Make sure each time you cut from a different piece of the plywood for the groups. For the remaining portions of plywood sheets, use them to make the supports, struts, trays, and feet.
If you want to build a portable table, saw you have to make the measurements top down to the floor. In this case, part 2, the front panel must be relatively smaller than 1. The back, part 3, should remain constant as per your plan building plan.
Another critical point to note, it is advisable to have the top slightly shorter than the table of the saw to make sure the workpieces are not hanging at the end of the cut.
Now you have parts 1 and 2. When cutting, one side must be darker than the other to avoid mayhem. Using one chunk instead of the other means you will have to dismantle the whole system to make things perfect as they should be.
Having one side darker than the other makes the project stylish and gorgeous attracting customers and potential buyers.
Building a DIY table saw outfeed table is not a tough job. It is now easy to create the table since you have the table parts.
Step 4: Cutting the Notches
In this step, you will get skills on how to cut notches accurately with interlocking notches. Cutting the grooves entirely is not an option; it is a must. We want notches to be 1/32 inches wider than the plywood.
The “play” in the notch helps for effortless setup and complete knockdown which provides for sufficient rigidity. The vertical distance downward of the groove should not vary (should be the same) to ensure the tops of each part is similar.
That means you must have a flat work surface which is essential for a sturdy saw table.
Before you start cutting the notches, set the depth of the saw, and test it by cutting to check the bottom. Screw a block to a sawbuck and clasp the sides one together to make sure the parts are upright and cut.
For every notch, make more cuts but not more than 1/8 inches apart. Cut slim strips of plywood with a chisel and glib the bottom of the groove with a roll.
Step 5: Cut and Setup the Side
Nail a thin piece of wood to a fragment of plywood from the side of the particle. Then mark and the marketplace at the bottom of parts 1, 2, and 3.
The radius should be 30 inches for parts 1 and 24-1/2 inches for parts 2 and 3. Use a jigsaw to cut the marked places (arches).
The crooked parts make the overall appearance of the whole project making the pieces more straightforward and easy to set up.
To finalize the sides 1, glue and nail ¾ * ¾ inches strips (4) on top of the rear notches.
To make it easy to set up the outfeed table, cut and notch the struts (5A). Next, glue and nail the support (5B) to the interior parts of the struts.
Step 6: Assembling the Feet
It’s time to make the feet of the table. Cut the remaining plywood into small parts. To ensure they don’t collapse whenever you lay a heavy load, nail and glue them.
Also, pay keen attention to the alignment of the edges because they must sit flat for the process to be called a success.
Because you want to make something pleasant, use the belt sander to smoothen the exterior corners.
To avoid any sticky substance on the feet, remove the excess glue oozing. Finalizing this process means you are now unstoppable.
Step 7: Work on the Outfeed Table
Building a DIY table outfeed may sound a little challenging, but trust me the whole process is very effortless. With the feet supporting the entire system, it is now easier to set up the side and anchor the table.
Do you remember our top (4)? Before gluing and nailing the outfeed, we need first to make sure the struts are in the right place so that they don’t bind during setup and knockdown. First glue and nail the struts.
Next, check on the intersecting joints to ensure they all interlock at one place, and that no portions of the outfeed table are short of sides. Ensure also that the front panel (2) is even with the sides.
If you notice the notches fit very tightly, widen them by a roll or file. Tight grooves will result in high depreciation; hence the table won’t last long. If they are in-depth than usual, glue a slim wedge into the bottom of the notch.
Now it’s time to make holes for trays and the hanging parts of the wall. You can use your measurements, but you should use the drills of 2-1/2 inches and 16 inches on the central component to match with the wall studs.
It is imperative to make the clear when you are working in the drills to avoid doing the wrong measurements. To do so, start the holes from one side before attempting the other. Remove the drill to finish the gap from the other side as soon the pilot bit emerges.
Once you have the overall project complete, round the edges of all parts with a router bit, you can use a 3/8 inch round-over router bit. That makes the whole work look spontaneous and helps to reduce the sharp fragments on the edges of the wood.
You can also decide to avoid this process since it is not mandatory. Next, sand the plywood using sandpaper to make all parts smooth.
Wiping-On poly will reduce warping due to changes in the environment. Also, it will mark an overall finish of the whole project.
Step 8: DIY Table Saw With Stand and saw Extension
Making your saw have a position may add merit to the whole system. Stands will support your work as well as your table saw workstation. All you need to do is glue and nail 1*2 cleats to the side parts.
Drop in a slap from plywood and you’ve got an excellent platform as a saw extension and for a benchtop of your saw. To build an outfeed table and side support you can crosscut full sheets of plywood without a helper.
Step 9: Biesemeyer Fence-finish and Aligning the Fence
Having a solid square fence for your table saw workstation might be essential. Some best cabinet table saws under 1000 might come with their wall but you can also build one for your homemade workstation.
Biesemeyer and incra table saw fence had been there for an extended period now. You can purchase metal for this fence and set it to work bolting. You may need an Aluminum extrusion which is slightly expensive but you can go for steel as a substitute.
You need to have a primary guide installed onto the frame to start working on the supporting brackets. Also, clamps may be necessary for aligning the rail. Use the drill press to clean the ends.
Make it swift to work on the adjustable bolt. Align the fence carefully using a tape measure. Ensure you check the alignment of the blade keenly to the miter spaces, and Then Square up the wall.
Conclusion
While a table saw workstation might sometimes seem challenging to reproduce, following the above simple steps may give you a different perspective concerning the same.
Now you are in a position to build your table saw workstation. It is affordable to maintain a homemade table saw workstation.
Moreover, it will preserve your space and work as per your specified needs. In the beginning, you might make a few mistakes but once you catch the momentum, it will be a fan.
The biggest question you should be asking now is not how to do it but when to start the process.
You May Also Interested to Read:
1. How to Make a DIY Homemade Portable Miter Saw Table Station Easily
2. How to Do Woodworking in An Apartment – Wood Workshop Guide
3. How to Make a DIY Table Saw Fence – Simple Guide and Plans
4. How to Make a Simple DIY Wooden Picture Frame Out of Wood Trim
To Learn More About Woodworking and Carpentry Visit at iSaw GuideHome.
Table of Contents