A stationary belt sander is a powerful tool that can be used for various tasks, such as sanding wood, metal, and plastic. It comes in multiple sizes, with the most common being 3″ by 18″ or 4″ by 24″.
They can be used for many purposes, including sanding wood floors, removing paint or varnish, and shaping metal. This article will discuss the proper way to use a stationary belt sander.
How To Use A Stationary Belt Sander
To use a stationary belt sander, it is vital to first prepare the surface by removing any debris or loose material. Once the surface is ready, start sanding in short, consistent strokes.
Next, adjust the belt sander to the desired angle. Then, hold the belt sander with both hands and apply pressure while moving it in a back and forth motion.
Be sure to keep the sander moving at all times; if it stays in one spot for too long, it will create a gouge on the surface.
Finish sanding by going over the entire surface again with fine-grit sandpaper.
Things To Keep in Mind When Using A Stationary Belt Sander

When using a stationary belt sander, keep a few things in mind for safety and proper use:
- Always wear goggles and a dust mask to protect your eyes and lungs from the debris created by the sanding.
- Use moderate pressure when sanding; too much stress can damage the workpiece or the belt sander.
- Keep the belt sander moving at all times; if you stop it in one spot, you may create gouges in the workpiece.
- Regularly clean and lubricate the belt sander to keep it running smoothly.
Common Mistakes People Make When Using A Stationary Belt Sander

People make a few common mistakes when using a stationary belt sander. One is not using the correct grit sandpaper. Another mistake is using too much pressure, which can cause the belt to snag or even come off the machine.
People also often try to sand too large an area at once, leading to uneven results. It’s essential to take your time and use a light touch when sanding with a belt sander.
Tips For Getting The Most Out Of Your Stationary Belt Sander

A stationary belt sander is a great power tool for shaping and finishing wood pieces. It can also be used on other materials, such as metals. Here are some tips to help you get the most out of your stationary belt sander:
1. Keep the tool clean. The sanding belt will last longer and perform better if free of dust and debris. Wipe down the housing and the belt every time you use the tool.
2. Lubricate the bearings occasionally. This will help keep the belt running smoothly and prevent it from wearing out prematurely.
3. Be sure to adjust the tracking properly. If the belt is not aligned correctly, it can cause excessive wear on both the belt and the bearings.
4. Use a good quality sanding belt.
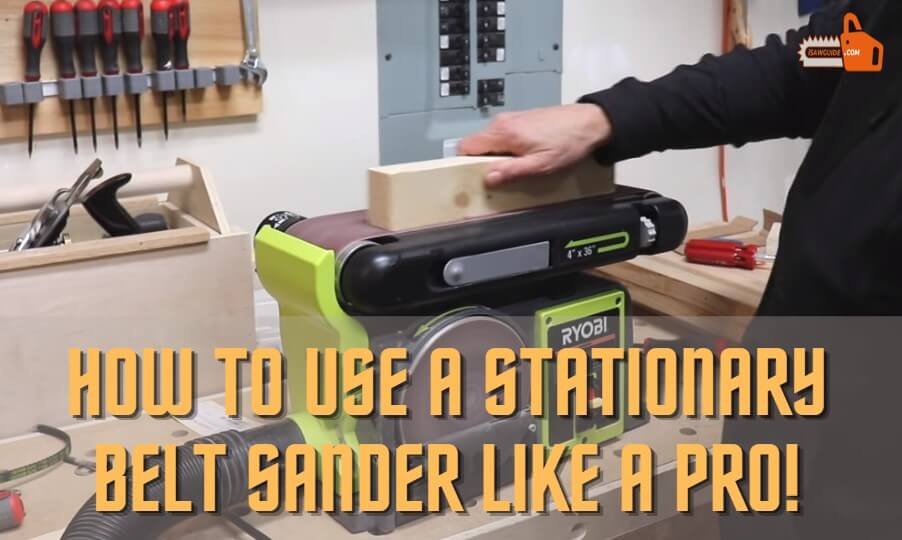
How To Hold The Stationary Belt Sander

When working with wood, you will often need to smooth the surface down. One way to do this is with a belt sander.
These can be handheld or stationary. If you are using a stationary belt sander, it is essential to hold it correctly so that you don’t hurt yourself and that the sanding is even and effective.
To hold the stationary belt sander, you will need to use both hands. Place your dominant hand on top of the tool and your other hand below it.
Make sure that your hands are gripping the front and back of the tool. You should then apply pressure with both hands as you sand the surface.
The most important thing to remember when holding a stationary belt sander is that you should keep your hands away from the spinning part of the tool.
The spinning action can cause painful injuries, including blisters and cuts.
Here are a few ways to hold the tool
1. Use a dust mask – The dust produced by stationary belt sanders can irritate the eyes and lungs, and it’s best to wear a face mask when using one.
2. Use a work glove – The best way to hold the sander is with two hands, but if you only have one hand available, you can use a dust mask or work glove on your non-dominant hand to hold the belt sander.
3. Use a non-dominant hand to hold the belt sander – Even though your dominant hand is holding the sander, you can still use your non-dominant hand to hold the tool. This will allow you to avoid any possible injuries from using only one hand.
4. Change the belt on the sander frequently – If you have to use only one hand for an extended period, it’s best to change out the belt on the sander often to avoid any possible injuries from holding it improperly.
6. Do not let the belt sander contact any part of your skin.
How To Adjust The Belt Of A Stationary Belt Sander

When adjusting the belt of a stationary belt sander, it is vital to ensure that the belt is correctly aligned with the sander’s pulleys.
This will help to ensure that the belt runs smoothly and does not come off the pulleys. The following steps can be used to adjust the belt of a belt sander:
1. Disconnect the power cord from the outlet.
2. Remove the screws that hold the cover in place.
3. Locate the screws that hold the front and back plates together.
4. Loosen these screws and remove the plates.
5. Locate the adjustment bolt for the belt and loosen it slightly.
6. Slide the belt off of one of the pulleys and re-position it on the other pulley.
7. Tighten the adjustment bolt to a snug setting.
8. Re-attach the cover and plates and reconnect the power cord.
9. Turn on your belt sander and test it for proper operation.
How To Start Sanding With A Stationary Belt Sander

When starting to sand with a stationary belt sander, there are a few things you need to know to do the job safely and efficiently.
First, select the right grit sandpaper for the job. If you are starting, it is best to start with a medium-grit paper and work your way up to a finer grit if needed.
Be sure to use a dust mask when sanding, as airborne particles can harm your lungs.
Hold the belt sander with both hands and position it so that the sandpaper is flat against the surface you are working on.
Apply pressure and move the sander in short, consistent strokes. Remember to keep the sandpaper moving at all times, or you will have an uneven surface.
Sanding Techniques With A Stationary Belt Sander

A stationary belt sander is a handy tool for sanding projects around the house. It is convenient for larger tasks, such as refinishing a table or sanding down a deck.
To get the best results from your belt sander, it is crucial to use the proper techniques. Here are a few tips for getting the most out of your belt sander:
When sanding a large surface, always start with the coarsest grit and work your way up to the finest grit. This will help to ensure an even finish.
Be sure to keep the sander moving at all times. If you stop sanding, you will leave behind unsightly scratches.
When sanding curves or corners, use a light touch and go slowly. You don’t want to gouge the wood with the belt sander.
Finishing Tips With A Stationary Belt Sander

When using a stationary belt sander, it is crucial to keep in mind the following tips to ensure a smooth, even finish:
1. Always use the correct grit sandpaper for the job. Finishing with a higher grit than necessary can create a rough surface.
2. Be sure to sand in the direction of the wood grain. This will help minimize swirl marks.
3. Start with medium-grit sandpaper and work your way up to a finer grit for the final finish.
4. Use light pressure when sanding. Applying too much pressure can cause scratches on the wood surface.
5. Keep the sander moving to avoid creating swirl marks or gouges in the wood.
6. Sand in small sections, working your way from one end of the piece to the other.
What To Look For In a Stationary Belt Sander
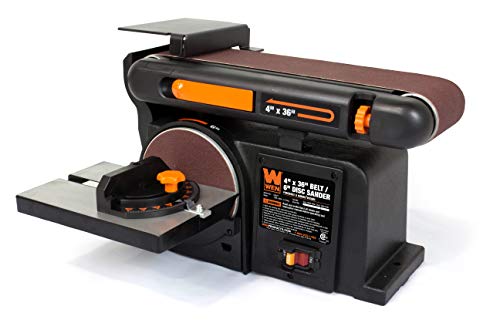
- Two-in-one sanding machine includes both a 4-by-36 inch belt and a 6-by-6 inch disc
- Belt tilts anywhere from 0 to 90 degrees
- Sturdy cast iron base prevents any heavy vibrations
- 4.3 Amp motor provides up to 3600 RPM
- Tension release lever provides for simple changes between sandpaper gr
Stationary belt sanders are a great addition to any workshop, and there are a few things you should look for when purchasing one.
The first consideration is the size of the belt. You want to make sure that the sander can accommodate the size of the project you plan to work on. Another critical factor is the power of the motor.
A more powerful motor will be able to handle larger projects more efficiently. Additionally, you’ll want to consider the features of the sander.
Some models come with a dust bag to help keep your workspace clean, while others have a variable speed control which allows you to adjust the speed depending on the project.
Frequently Asked Questions (FAQs):
Q. How Would You Do Surface Sanding On A Stationary Belt?
A. There are a few ways to do surface sanding on a stationary belt. One way is to use an orbital sander. This will help to get the job done faster.
Another way is to use a sanding block. This will help you achieve a more consistent finish.
Q. What Are The Safety-first Rules On Using A Stationary Belt Sander?
A. Stationary belt sanders can be a great addition to your workshop, but they can also be dangerous if not used correctly. Here are some safety first rules to keep in mind when using a stationary belt sander:
1. Always wear safety goggles when using a stationary belt sander. The belts can fly off the machine and hit you, potentially causing severe injuries.
2. Make sure the belt is correctly aligned before starting the machine. If the belt is not aligned, it can come off the machine and cause injuries.
3. Keep your hands clear of the belt at all times. The belts can quickly remove skin if they contact your skin.
4. Don’t apply too much pressure to the sanding surface – this can cause the belt to break or come off the machine.
Q. Is A Belt Sander Better Than An Orbital?
A. There are a few factors to consider when deciding whether a belt sander is better than an orbital.
The first thing to consider is what you will be using the sander for. If you use it to remove large amounts of wood, then a belt sander is better.
If you use it for detailed sanding or finishing, then an orbital is better. The next thing to consider is your experience level.
A belt sander can be more challenging than an orbital, so if you are a beginner, an orbital may be a better choice.
Finally, consider your budget. Belt sanders are generally more expensive than orbitals.
Conclusion
A stationary belt sander is a powerful tool that can be used for various projects. Typical projects that can be completed with a belt sander include sanding wood floors, sanding down doors, and sanding down furniture.
It can be a great addition to your tool collection, especially if you know how to use it properly. Using a stationary belt sander is easy to achieve smooth, polished surfaces.
With a little bit of practice, you can use one like a pro. Be sure always to use caution when working with power tools and follow all safety instructions.
By following the tips in this article, you can become a pro at using a stationary belt sander and get the most out of this versatile tool.
Thanks for reading!
You May Also be Interested to Read:
1. What Are Belt Sanders Used For In Woodworking And Carpentry?
2. Belt Sander Vs Palm Sander – Which One Perfect For Your Project?
3. 11+ Best Orbital Sander For Wood, Furniture, Deck, And Metal Sanding – Reviews And Buying Guide
4. What Are The Best Drill Presses Used For In Woodworking And Carpentry Shop? What It Is And How Do You Use It?
To Learn More About Woodworking and Carpentry Visit at iSaw Guide Home
Table of Contents