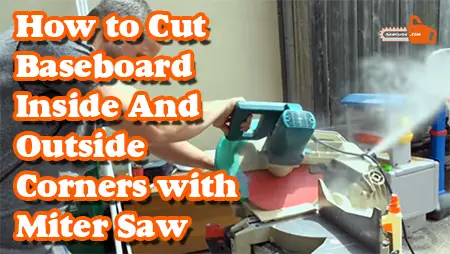
The best and easiest way to perform your projects or woodworking tasks is by using the right tools to enable you to complete the specified task than turning to somebody else every time to help. One of the essential tools you should consider is the best value and rated miter saw. How to Cut Baseboard Inside-Outside Corners with Miter Saw
To get clean finishes on your woodwork tasks of cutting in and out of baseboard corners. You only need a powerful tool as well as skills for efficient performance that features ease of mind use. This review will guide and give solutions to problems you have been facing while using the miter saw and tips for cutting the baseboards. Have an easy time going through the review.
How to Cut Baseboard Inside-Outside Corners with Miter Saw
First, you should be aware of the types of joints that a baseboard has.

Types of joints
Scarf joint
This is the longitudinal joint that is made by uniting two tapered ends.
Miter joint
It’s a junction that can be intersected by two beveled parts at 45 degrees to form a right-angled corner.
Butt joint
It’s said to be one of the simplest joints, you only need to unite the two ends of the workpiece.
Coped joint
This is a special joint one end is cut and trimmed uniformly to fit on the first end while the other end is a butt joint.
Before the process of cutting starts, identify the types of tools you require: measuring tape, safety glasses, dust mask, pencil, and clamp.
How Is A Miter Saw Used?
Safety
Before you commence performing your woodwork tasks, ensure you are working in a clear, clean, and safe working area. Wear protective clothing including goggles for eye protection.
Operation
Most of the best miter saws are powered by the handles. The blades begin rotating when the handle engages are compressed. Ensure your baseboard pieces are safe and well supported by the best portable miter saw stand or table where necessary.

Baseboard cuts
All marked and well-measured baseboards are supposed to be aligned accordingly. Hold the handles down to engage the blade at all means. With the baseboard piece still in position, lower the blade accurately in a chopping manner. Allow the blade to run through the board. To stop the blade, disconnect the handle. Remove your cuts and raise the blade when done rotating.
You can cut baseboard pieces at an angle by shaping or sliding the saw heads. Miter saws are different, but for shaping both inside and outside corners, it’s advisable to review the manufacturer’s instructions for your model.
What Saw Is Recommended To Cut Baseboards?
Decide on what type of miter saw that is preferred to cut baseboards. Most of the common miter saws are electric powered. These best portable miter saws are used for chopping and intersect two baseboards. Miter boxes are known because they are non-electric. Miter boxes are easily affordable and effective.
All these miter saws function the same, the only difference is through different features each machine hold. These four types are commonly known for cutting the baseboard corners.
Compound miter saw
This machine is commonly preferred compared to other types of saws since it has more bevel options. The bevel and miter features in the compound saw allow the user to cut the corners at different angles as well as allowing simultaneous use of the features.
This saw offers a mechanism and technique that lets the user rotate to either side. Besides, it aids in sliding from one position to another. It’s said to be the best and viable miter saw thus classified as complex.
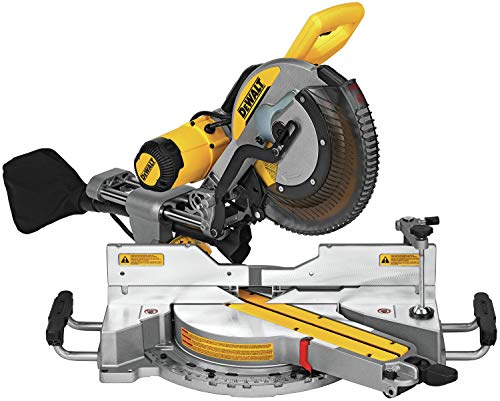
- Stainless steel miter detent plate of the 12-inch miter saw blade comes with 10 positive stops
- The mitre saw has a precise miter system and machined base fence support
- Precise miter system and machined base fence support Cam-lock miter handle with detent override delivers quick and accurate miter angles for DEWALT miter saw
- Tall sliding fences support 6-3/4-inch base vertically
- Bevels 0 degree - 48degree left and right
- 2-inch x 14-inch dimensional lumber cross cut capacity at 90 degree and 2-inch x 10-inch dimensional lumber at 45 degree
- Dual horizontal steel rails with innovative clamping mechanism and linear ball bearings for accuracy and durability
- Efficient dust collection system captures over 75% of dust generated
- Oversized, high visibility bevel scale with positive stops.
Miter sets
It’s found in both standard and compound miter saws. The turntable swings at an angle of 45 degrees in either direction. The miter cut is used for cutting from the top of the baseboard.
Bevel is setting
It’s featured in the compound miter saw. The blade can be flipped to either side
At an angle of 45 degrees. It’s mostly used for cutting the face of the boards.
Chop saw
From a single point or location, this machine is used to make several cuts that don’t require other different angles other than the right angle.
Dual-purpose compound miter saw
This machine performs dual tasks. With a few double bevel and operators helps to pivot to all sides of the baseboards. This gives in flexibility in shaping cuts in the absence of moving boards to accommodate.

- Powerful 15 Amp, 3,800 rpm motor delivers extended power and durability
- Exclusive Back Fence Design cuts up to 2x16 dimensional lumber at 90° and 2x12 at 45°
- Super efficient dust collection system captures over 75% of dust generated.
- Wide adjustable infeed and outfeed work supports provide up to 8 of material support
- Easily adjustable mounting rails adapt to nearly any miter saw
- Wide rubber grip wheels provide easy jobsite mobil
Sliding compound miter saw
An additional sliding technique in this best sliding miter saw for homeowners enables the operators to pull the saw back to cut wider boards.
Most of the best portable and cordless miter saws had several features including lasers that are used to visualize the position of cuts onboard before completing the sawing tasks.
Besides, most of the experts prefer upgrading their machines. Despite the saws being the best and appropriate machine for baseboard cutting, their blades are mostly not designed for trimming. Most of the experts upgrade the blade to about 60 tooth blades. The higher the tooth count blades, the faster the completion of work. This is for the more tooth blades to create a cleaner cut, sharper and it limits tear out. Check the size of your blade and shape before you go to purchase one.
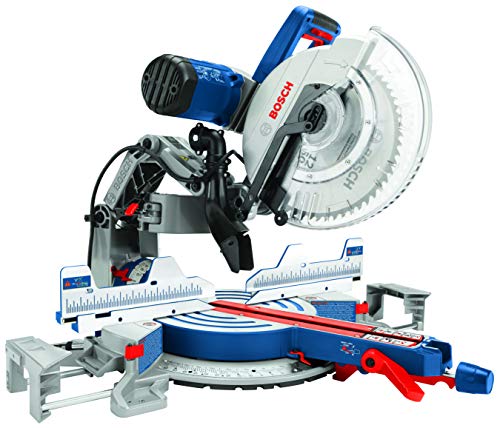
- Axial glide system: The patented glide system allows wider cross cuts and better alignment while also being compact; This saves you 12 inch of valuable work space; Bosch glide miter saw also offers unmatched smoothness of cut
- Capacity: Expanded cutting capacity 14 inch horizontal capacity nominal 6 1/2 inch vertical capacity against the fence base 6 1/2 inch crown capacity against the fence 45 spring
- Adjustable: The GCM12SD miter saw provides easy adjustments with a large easy to read uniform bevel and stainless steel miter scales with marked detentes and roof pitch angles; Bevel detents: 0, 33.9 degree, 45 degree left/right for accurate cuts; Category best 90 percentage dust collection optimized for cutting 2x material with a vacuum
- Precision: Square lock quick release fences lock fence 90 degree to the table and requires no adjustment, 1 touch lock/unlock to slide fence for added support
- Ease of use: Upfront bevel controls all metal bevel lock lever and range selector located upfront for quick and easy bevel settings without reaching behind the
Miter box
This is the non-electric version of the miter saw. This machine contains several slots with common angles. A miter box is mostly purchased while packaged accompanied by a saw and plastic box. This machine box mostly requires more effort from the user. It is the best value miter saw, it’s a less involved chance for quick making common cuts. Analog versions include what should be considered as a hybrid of the baseboards while holding a handsaw with a sliding motion.
Steps to follow while cutting the baseboard joints.
The first step is by cutting a scarf joint.
- Look for the longest wall that will make your work easier. Start by using one baseboard.
- Measure correctly and carefully, then cut the end of baseboards at a right angle. Make sure the ends run perpendicular.
- If you are using two pieces for the first wall, join them.
- For the scarf joint to be secured, it’s advisable to cut and place the two boards at a stud location.
- Start with two pieces of baseboards that are already cut at 90 degrees.
- Cutting the scarf joints in the middle, place the first board in position and mark with a pencil a 45-degree cut.
- Use the right and portable miter saw to lacerate 45 degrees at the end of the first board then smoothing it.
- Mallet the baseboard in position with some nails. Make sure you do not over sand as well as heads of finish nails are well exposed.
- Use the tape measure to measure the next board and draw an accurate cut from the already placed board.
- When done with the second baseboard, join them together. In case of a slight bow, trim the ends again at 90 degrees.
- Run some glue on the angled joints and slide the two boards together.
- Drive one nail to the top of the base to make sure the joint is safe.
- Drive another nail towards the angle and place it on the floor.
- With a nail set, you are free to drive other exposed nails.
The second step is by cutting the inside joint.
- The inside corner joint is also referred to as the coped joint. It cannot be said to be a butt joint because of the presence of a gap between the two baseboard pieces. To escape those gaps you are supposed to construct an inside joint.
- Put one piece of baseboard against the wall at a right angle.
- Set the other piece of board and place it down on the floor.
- Hold and mold the scrap piece of the board perpendicularly and trace its profile by use of a pencil.
- For you to find a reference point, this will help you to trail and facilitate the completion of the inside corner joint.
- Cut and shape a 45-degree angle piece of baseboard by use of appropriate miter saw.
- Rotate the angle to a clockwise direction till it is elevated to the left-hand side and towards the right-hand side of the machine. Cut all through to create the best corner angle.
- Cut along the profile and create a bevel cut and short a profile at a 90-degree angle. To connect and engage the cut trim together to identify holes and gaps in between the baseboards.
- For best and smooth baseboard inside corner, trim accurately one of the boards, hold the other board straight and position it on the floor and allow it to connect with mating piece.
- The final step is to remove the back bevel that will install a half round and other files till the boards fit the other with no gap.
- Put some glue before you join the two baseboard pieces before you do finishing.Inside corners are places where 2 walls intersect to create a concave angle.
- Nail your piece boards and ensure that the boards are correctly set exactly as when leaned to the wall.
- It’s advisable to use 1.5-inch brads while closing the corners.
The third step is by cutting the outside joint.
- Cut, measure and put in place and shape the baseboard around your room.
- Set the first baseboard piece to extend over the outside corner.
- Mark correctly in position where it will come into contact with the other piece of the outside corner of modeling and placing the square and combine them against the wall and surface.
- Use a miter box or power miter saw to trim the baseboard at 45 degrees.
- Follow the above steps to mark and construct the second piece.
- Test for fitting before you start the nailing process.
- Put some glue before you join the two baseboard pieces before you do finishing.
- Nail your piece boards.
- It’s advisable to use 1.5-inch brads while closing the corners.
- It’s also recommendable to smoothen out the edges with appropriate measures like wood file for safety.
For all gaps and holes in baseboards, use wood glue to fill as well as a wood filler. Allow it to completely dry before the excess is sanded off. Use caulk along the baseboards to fill the cracks of the baseboards and the walls.
Tips
- To get the appropriate and correct baseboard corner, be keen while taking measurements and marking. Make sure all corners are at the required angle.
- There is a high probability that during the first process of cutting, the cuts created by the use of the best portable miter saw may differ. Shape and trim accordingly with accurate measures till the baseboard piece fits.
- Most of the cut corners hardly get perfect. All you need is to cover the gaps with caulk and other equivalent means.
- Be keen and take time during the working period to minimize the number of mistakes. You are allowed to reduce the trim to the required length.
Final Verdict
In conclusion, for you to achieve your goals and perform the task to your level best, all that you require is skills. For those who dream big, to become experts on using the miter saws to sharpen and smoothen the baseboard corners need to do more practice and use the skills into use. By just learning the basics you can’t enjoy fully the pleasure.
You have to practice more and invent your moves and skills. This is what it means to be a miter saw operator. The main aim of this review is to enable miter saw operators to understand and put into practice the techniques and mechanisms used to produce better results.
Table of Contents